Monday, March 28, 2016

Creamy Spinach, Feta and Bacon Quiche Cups


I'm glad to have that off my chest and now back to why I'm here.  The good grub. 

love quiche.  Growing up it was a special occasion dish that my Mom graced our table with for the holidays.  I'm a huge fan of traditional quiche but I wanted to put a spin on it for a Simply Potatoes® recipe contest that I entered a while back.  I gambled that spinach, hash browns, feta and smokey bacon could meld terrifically in the crust-less quiche base.

I was right. 

Give them a try, they'll be a creamy comforting hit for the whole family or a classy brunch with friends.


Creamy Spinach, Feta and Bacon Quiche Cups
Recipe by Bliss From Scratch | Printable Version 

  • 1 1/2 cups Simply Potatoes Shredded Hash Browns®
  • 6 Bacon strips, crumbled
  • 1 cup fresh Baby Spinach, chopped or torn
  • 1/3 cup Feta Cheese, crumbled
  • 4 Eggs
  • 2 cups Heavy Cream (or half and half for a lighter option) 
  • 1/2 teaspoon Salt
  • 1/4 teaspoon Sugar
  • 1/8 teaspoon Cayenne Pepper

Preheat the oven to 425° and coat the cups of a cupcake pan with non-stick spray.  Divide the hash browns evenly into the cups, about 2 tablespoons each, and bake until the edges begin to brown, 8-10 minutes. 

While the hash browns are baking, cook and crumble the bacon, set aside.  Chop the spinach, set aside.  In a mixing bowl add the eggs, cream, salt, sugar and cayenne, whisk until well combined.

When the hash browns are done divide the bacon, feta, and spinach into the cupcake pan and then fill the cups with the egg mixture.  Each cup should be almost full. 

Bake at 425° for 5 minutes, and then reduce the heat to 375° and bake for another 10-15 minutes, or until the tops begin to feel firm and an inserted toothpick comes out clean.  Important tip: place the pan on a rack to cool for 5 minutes and then use a knife to skim around the edges of the quiches (to help them release from the pan), remove and serve.  Enjoy!
 

Friday, March 18, 2016

Fried Scones


I put a plate of scones I had just fried on the counter between my mom and I.  There were five scones on the plate to be exact.  She ate one and commented on how wonderful it was.  Well, you can never eat just one, so she had another.  She went to grab a third and said, "Last one!"  A minute went by and she kept eyeing the last two.  Temptation gave in and she grabbed the fourth-"Last one- promise!"  She gobbled that one down and now that lonely last scone was calling to her.  We looked at each other, then the scone, then back at each other.  I'm not sure what she was thinking, but I had that look on my face that said, Dare ya.  She ate it- no joke!  Five scones in five minutes- I'm pretty sure that's a record!

That's the only problem with these scones-they're irresistible.  You eat one and tell yourself "that's it".  Then somehow you talk yourself into eating another, but only on the terms that it's your last.  Before you know it, you're eating another one (and of course it's going to be your last)!  If you eat more than five, you hold the record :)


RECIPE

1 quart buttermilk
2 TBL yeast
2 TBL sugar
1/4 cup warm water
2 eggs
2 TBL oil
8 C. flour
1 TBL Baking Powder
1/2 tsp Baking Soda
1 1/2 tsp Salt

* In a Kitchen Aid, combine water, yeast and sugar.  Let that set while you warm the buttermilk in a large sauce pan.  Remove the milk from the heat when it is warm to the touch (I stick my finger in it to test it).  Add eggs, oil and milk to the yeast mixture.  Combine half the flour with the remaining ingredients, then add to the dough mixture.  Add the remaining flour and let it knead for about five minutes, or until all the flour is incorporated.  Put the dough in a large greased bowl or Tupperware container.  Put it in the fridge and let it raise at least all day, preferably overnight.  Heat oil in a large pot to 375 degrees (I have an electric fryer which makes this so much easier).  Heavily flour a counter surface, grab a large handful of dough and roll in in flour until it's all covered.  Roll it out to about 1/4" thick and cut with a pizza cutter into desired shape/size.  Fry for about 3-4 minutes on each side, or until golden brown (they'll bubble up when frying).  Remove onto a paper towel or cooling rack (see tip below).

Eat them hot with honey butter............or toss them in Cinnamon Sugar- (my personal favorite)...


...or use them instead of tortillas the next time you have tacos.  We do this often for big family gatherings.  


Tips:
  • Don't let the buttermilk get "hot"- you don't want to cook the eggs.  Warm to the touch is perfect.
  • The dough is super sticky.  Cooled dough is easier to work with and make sure you use lots of flour when rolling it out.


  • It will continue to raise in the fridge- a large Tupperware bowl that has a lid is the best.  If you don't have one, just separate the dough into 2 bowls and cover tightly with saran wrap.
  • It makes a lot of scones!!  I usually make this recipe when we have a family gathering so there's never leftovers.  My friend halved the recipe and it worked great.  You can refrigerate the dough for at least 3-4 days; I'll save my oil and make fresh scones during that time.
  • I put a cooling rack on top of a cookie sheet and set my scones on that after coming out of the fryer.  It lets excess oil drip off.
     If I'm frying a bunch and need to keep them warm, I'll turn the oven on to the lowest temperature setting.  When it's done preheating, I'll turn it off- you just want to create a 'warming zone' to keep the finished scones in.  
  • For the cinnamon/ sugar I mixed 1/2 cup sugar and 1 tsp cinnamon together.  I let the scones cool for 2-3 minutes after coming out of the fryer, then toss them in the sugar mixture.  
  • I have family that like their scones a little thicker- just make sure you fry them long enough to cook the inside.

Thursday, March 17, 2016

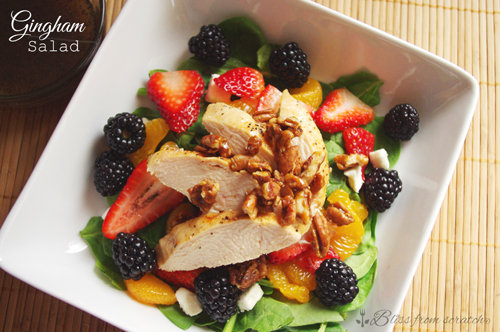
Gingham Salad


Gingham Salad. It's worthy of an intro.


As a teeny bopper I "life guarded" at one of the local country clubs. Let's be honest, it's a country club, and the few senior members that did make it down to the docks didn't have the energy to swim once they made it there.  And I don't blame them.


Subsequently, I was paid to be the bronzing beauty that guarded... the "dock" and my lunch plate.  Free gourmet country club food?  Worth every hour, hello.


The Gingham Salad was the pinnacle of my summer bliss.  It's a perfect symphony of fresh berries, mandarin oranges, feta, candied pecans, grilled chicken, and a dressing that is heaven in its self. You will not have lived until you taste THE Gingham Salad. Oooooh the dressing... don't get me started. So simple. So fresh. So perfect.

Adapted from the Hayden Lake Country Club's Gingham Salad.


Tell me what you think!

 photo AcaleySig_zpsdd802c52.jpg 


Gingham Salad
Bliss From Scratch | Printable Version

  • Candied pecans (recipe follows or can use store-bought)
  • Gingham dressing (recipe follows)
  • Canned mandrin oranges
  • Fresh blue berries
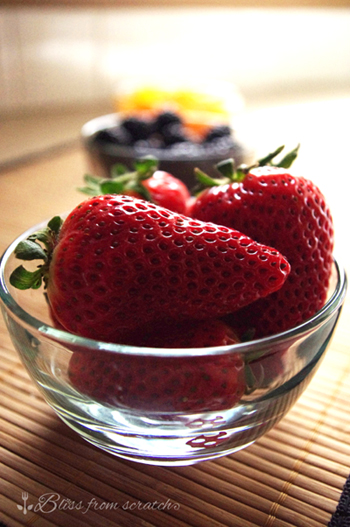
  • Fresh strawberries
  • Black berries*
  • Raspberries*
  • Grilled chicken*
  • Feta or blue cheese
  • Salad greens of choice
  • *optional, but highly recommended

Assemble greens, berries, fruit, and chicken. Top with cheese, nuts, and dressing--skimping on these ingredients is like trying to do jumping jacks without legs.  Let your mouth and mind be blown away.  This is my all-time favorite meal, ever.


Gingham Dressing
No substitutions will work.  Believe me, I've tried.  Dressing will last in the fridge for weeks, but using fresh onion with reduce the shelf life.  You'll make it again soon after, I'm confident of that. wink-wink.

  • 1/4 cup sugar
  • 1 teaspoon dry mustard
  • 1/2 tablespoon poppy seeds
  • 1/2 teaspoon salt
  • 1/4 teaspoon onion powder OR 1 tablespoon small yellow onion
  • 2 tablespoons cider vinegar
  • 1/2 tablespoon balsamic vinegar
  • 1/3 cup salad oil (canola or olive oil)
In a blender, mix all of the ingredients for 1-2 minutes.


Candied Pecans
  • 1 cup pecans
  • 2 tablespoons butter
  • 5 tablespoons brown sugar
  • 1/4 teaspoon cinnamon
  • pinch of nutmeg

In a small skillet, melt butter and sugar over med-low heat.  Add pecans and spices, stir until pecans are fragrant and well coated (they should appear sticky with the melted sugar coating them).  Remove from heat and spoon the mixture onto parchment paper, break apart as desired if the nuts are clumping together.  Cool completely before serving.
Bliss From Scratch

Monday, March 14, 2016

Texas Sheet Cake


I'm in a chocolate mood today (well, everyday can include chocolate in my book!)  This is a cross between a brownie and cake- I've heard people call it both.  I'm not sure what I've decided it is.  But I did make up a song for it since I grew up in Texas.  "The cake at night is a big delight...(clap, clap, clap, clap)....deep in the heart of Texas!"  Alright, cheesy moment gone. 


RECIPE

2 C. flour
2 C. sugar
1 tsp baking soda
1 tsp cinnamon
1/4 tsp salt
3/4 C. water
1 stick butter
1/4 C. cocoa
1/2 C. buttermilk
1 tsp vanilla
2 eggs

* In a large bowl, whisk flour, sugar, soda, cinnamon and salt together- set aside.  In a medium saucepan, bring water, butter and cocoa together (stir slowly & constantly).  When the sauce comes to a boil, add to the flour mixture and beat until it's well mixed (it will turn into a chocolate clump).  Add the buttermilk and mix, then vanilla (mix), then one egg at a time and keep mixing until everything is combined.  Spray and flour a cookie sheet and pour the batter in, spreading it with a spoon or spatula.  Bake at 375 for 15-17 minutes, turning half way thru.  Pour the frosting on right after it comes out of the oven:

Frosting
6 TBL butter
1/3 C. milk
1/4 C. cocoa
3 C. powdered sugar
2 tsp vanilla
1/4 C. chopped pecans (optional)

* While the cake is baking, get the frosting ready.  (I use the same bowl and saucepan that I used for the cake....brownie....:)  Measure out the powdered sugar in a bowl.  Bring butter, milk and cocoa to a boil.  Pour it in to the powdered sugar and beat until well combined.  Add the vanilla and mix well.  Pour the frosting over the warm cake and use a spoon to spread it around (work quickly, cause the frosting starts to set as it cools.  You'll notice the 'cracks' in the first picture).  Sprinkle nuts on top.  Let the cake...brownie cool completely before eating.

Friday, March 4, 2016

Terriyaki Chicken Burger


Try fitting your mouth around this bad boy!  My all-time, without a doubt, forever, most favorite burger is Red Robin's Teriyaki Chicken Burger.  We lived in Vernal, Utah for four years- if you know where that is, congrats!  Let's just say that Red Robin doesn't exist in Vernal :(  So I created my own version to satisfy the withdrawals. 


RECIPE

4 Potato Hamburger buns
2 large chicken breasts (marinaded with recipe below)
lettuce
tomato
pineapple rings
4 slices Swiss cheese
onion rings
mayo

Marinade: 
6 oz can pineapple juice
1/3 C. soy sauce
1/3 C. packed brown sugar
1/4 C. oil
2 TBL apple cider vinegar
1 tsp mined garlic
2 tsp molasses

*Cut both chicken breasts in half so you have four 1/2" thick pieces.  In a gallon Ziploc bag, mix all the marinade ingredients together.  (Zip up the bag and really mix it so all the sugar dissolves).  Add chicken and marinade overnight or at least 8 hours.  Take the chicken out of the fridge 30 minutes before grilling.  Grill on medium heat for 5-7 minutes on each side, or until juices come out clear.  Grill the pineapple for 2-3 minutes on each side.  Toss some may on your bun, and layer everything up: lettuce, cheese, chicken, pineapple, tomato, onion rings and ENJOY!


Tips:
  • I have used fresh pineapple before, and it's super good...but unless it's sliced thick, it will fall apart when grilling.  I just use the canned pineapple rings since I use the juice in the marinade- nothing goes to waste.
  • Get the Swiss cheese at the deli so you buy as many slices as needed-this will be a lot cheaper. 
  • I always make fresh onion rings- but I don't have a post for those, yet.  Buy pre-made ones in the frozen section.... or sometimes if I'm close to Red Robin, they'll sell me a small box of their onion straws- which makes dinner super easy.  Or to make these slightly healthier, caramelize some onions.  Do whatever works for you.  The onion flavor is crucial for perfection (in my opinion).    

Tuesday, March 1, 2016

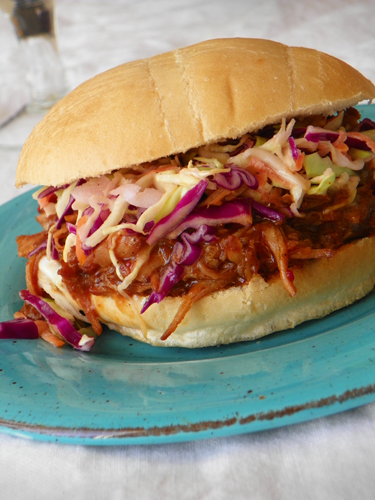
Zesty BBQ Slow Cooker Pulled Pork Sandwiches


It is written in the stars that zesty pulled pork and creamy slaw were destined to unite upon my sandwich roll and make all of my wildest saucy sandwich dreams come true.  

This is a super easy, messy, finger lickin' masterpiece of a sandwich that will please the masses.  

So let it be written.  So let it be done. 


Zesty BBQ Slow Cooker Pulled Pork Sandwiches
  • 3 lbs. Pork Roast (chicken works great too)
  • 1 bottle BBQ Sauce, 12 oz.
  • 1/2 cup Italian Dressing
  • 1/4 cup Brown Sugar
  • 2 tablespoons Worcestershire Sauce
  • 1/2 teaspoon Cayenne Pepper (adjust to your heat preference, I just have a little thing for Cayenne)
  • 8 large sandwich rolls
Place pork in a slow cooker.  Combine the rest of the ingredients and pour over the pork.  Or be like me and just dump it all in and don't dirty another dish.  Easy peasy.  

Cover and cook 3 to 4 hours on High, or 6 to 8 hours on low.  Shred the meat with forks, and stir to combine with the sauce.

Tip: Did you know that you can toss your frozen meat into your crockpot too?  It's a fantastic short cut if you want to skip the defrosting prep.  I do this often because my poor sleep deprived brain forgets to defrost the meat (my darling 8 month old baby girl believes she needs to nurse all night long) and this little trick has saved the day many times.  Or the dinner anyway.  Do remember though, that when you defrost your meat there is some liquid that drains off, and so you'll notice that your sauce may be thinner if you use frozen meat.


Basic Creamy Coleslaw 
  • 1/3 cup white sugar
  • 1/2 teaspoon salt
  • 1/8 teaspoon pepper
  • 1/4 cup milk
  • 1/2 cup mayonnaise
  • 1/4 cup buttermilk
  • 1 1/2 tablespoons distilled white vinegar
  • 2 1/2 tablespoons lemon juice
  • 8 cups shredded cabbage
  • 1/4 cup grated carrots
In a large bowl, whisk together the sugar, salt, pepper, milk, mayonnaise, buttermilk, vinegar and lemon juice until smooth.  Add cabbage and carrots and mix until combined.  Refrigerate at least 2 hours before serving.  

Halve your large sandwich rolls and generously heap with the Pulled Pork and Creamy Slaw.  Enjoy!

Recipe from Bliss From Scratch

Pecan Pie Mini Tarts

Pecan Pie Mini Tarts


I needed a sweet holiday fix.  One that was miles away from chocolate.  Being that I'm more of a vanilla girl and my soulmate is a choc-aholic, every now and again chocolate and I have to take a break.  

This recipe was heaven sent, and they're dainty and lovely to boot.  The caramely filling and cream cheese crust are a positively scrumptious pairing.  


Pecan Pie Mini Tarts
Recipe by Bliss From Scratch, adapted from Taste of Home | Printable Version


  • 3/4 cup butter, softened
  • 2 packages (3 ounces each) cream cheese, softened
  • 2 cups all-purpose flour
Filling: 
  • 1-1/2 cups packed brown sugar
  • 2 eggs
  • 1 tablespoon butter, melted
  • 1/2 cup pecan halves or pieces
 
In a large bowl, beat butter and cream cheese until light and fluffy. Gradually add flour, beating until mixture forms a ball. Cover and refrigerate for 15 minutes. For filling, in a small bowl, combine the brown sugar, eggs and butter.

Roll dough into 1-in. balls. Press onto the bottoms and up the sides of greased miniature muffin pan cups. Spoon filling into cups; top each with a few pecan pieces.

Bake at 350° for 20-25 minutes or until golden brown. Cool for 2-3 minutes before removing from pans to wire racks. Yield: 3 dozen.

Recipe From Bliss From Scratch